TL;DR: In some price-action methods, an order block is the last opposing candle or small range before a move that breaks a selected swing high or low. This guide describes one way to mark bullish and bearish zones, plan a retest, and set an invalidation level. Candle patterns do not identify the traders behind a move or establish a trading edge.
If you've spent any time studying Smart Money Concepts, you've heard the term "order block" thrown around constantly. But here's the problem: most traders learn the textbook definition, start marking every last candle before a move as an order block, and then wonder why price blows straight through their zones.
The method below uses selected swing levels and candle boundaries to make the chart markings more consistent.
This guide breaks down everything you need to know about order block trading strategy, from accurate identification to real entry setups, along with the common mistakes that destroy most traders' accounts.
What Is an Order Block in Trading?
An order block is a charting term used in some Smart Money Concepts methods for the last opposing candle or small range before a directional move that breaks a selected swing high or low. Traders use different rules to select the candle and its boundaries; a candle chart does not show who traded or whether orders remain unfilled.
Some traders interpret this sequence as prior supply or demand; the method in this guide marks it from candle and swing data.
That candle range is a candidate order block under this method.
Some traders interpret a return to the marked zone as a possible reaction area; the chart does not show that institutional orders remain unfilled.
The term is commonly associated with Inner Circle Trader (ICT) and broader Smart Money Concepts (SMC) material; it is not a standardized exchange term.
Bullish vs. Bearish Order Blocks: How to Identify Each
Bullish Order Block
The examples below use hypothetical levels, not historical market data.
A bullish order block forms before a strong upward move. To identify one:
- Find a significant impulsive move upward.
- Look at the last bearish (red/down-close) candle before that move began.
- The zone from the open to the low of that candle is your bullish order block.
- Ideally, this candle has a relatively small body compared with the impulsive candles that follow.
Suppose BTC ranges around 65,000, the last red candle opens at 64,800 and has a low of 64,500, and a later move closes above a swing high selected in advance. Under the rule above, mark 64,500–64,800 as the bullish zone. A trader could wait for a close back above 64,800 on a retest; a close below 64,500 invalidates this example's setup.
Bearish Order Block
A bearish order block is the mirror image. It forms before a strong downward move:
- Find a significant impulsive move downward.
- Locate the last bullish (green/up-close) candle before the drop.
- The zone from the open to the high of that candle is your bearish order block.
- When price returns to this zone, it may act as resistance.
If SPY is consolidating near 520, then closes below a swing low selected in advance, suppose the last green candle opened at 520.50 and had a high of 521. Under this method, mark 520.50–521 as the bearish zone. A close back below 520.50 on a retest could be a chosen trigger; a close above 521 invalidates the example setup.
How to Filter Order Blocks: The 3 Rules That Actually Matter
Here's what most traders get wrong — they treat every last opposing candle as a valid order block. This leads to dozens of marked-up zones on the chart, most of which price slices through like they don't exist. Use these three filters to identify order blocks worth trading:
Rule 1: The Move Must Create a Break of Structure (BOS)
For the method in this guide, require the move after the selected candle to break a swing high or low marked in advance. If it does not, the candle does not meet this method's rule; other traders may define swings differently.
On AAPL, if price has been making lower highs and lower lows, and then a bullish impulse breaks above the most recent lower high, the order block behind that move gains validity because smart money broke market structure to the upside.
Rule 2: Look for Imbalance (Fair Value Gaps)
Some traders add a fair value gap (FVG)—a three-candle pattern with non-overlapping first- and third-candle wicks—as another chart condition.
An FVG is a chart pattern, not evidence about who caused the move.
Rule 3: The Order Block Must Be Unmitigated
For this guide's convention, call an order block "mitigated" once price returns and trades through more than 50% of the zone. This is a charting rule; it does not show that orders were filled or that the zone has lost predictive value.
For this example method, use unmitigated order blocks — zones that price hasn't revisited since their creation.
Order Block Trading Strategy: Step-by-Step Entry Rules
Here's a concrete trading plan for order blocks that gives you specific rules instead of vague guidelines:
Step 1: Identify the Trend on the Higher Timeframe
Open your daily or 4-hour chart. Determine the prevailing trend using market structure — is price making higher highs and higher lows (bullish) or lower highs and lower lows (bearish)? You only want to trade order blocks in the direction of this higher-timeframe trend.
Step 2: Drop to Your Entry Timeframe
Switch to the 1-hour or 15-minute chart. Look for unmitigated order blocks that align with the higher-timeframe trend direction.
Step 3: Wait for Price to Return to the Order Block
Don't chase. Let price come back to the order block zone. This is where patience pays off — many valid order blocks take hours or even days before price retests them.
Step 4: Confirm the Reaction
When price enters the order block, wait for a confirmation signal: a bullish engulfing candle inside or at the order block (for bullish OBs), a rejection wick showing buyers stepping in, a break of structure on the entry timeframe confirming the reversal, or anAlgoAlpha indicatorsignal aligning with the expected reaction.
Step 5: Set Your Stop Loss and Take Profit
Stop loss: Choose an invalidation level outside the order block zone, accounting for tick size and execution conditions. Take profit: Define a target in advance, such as a previously marked swing; a reward-to-risk ratio does not establish an edge by itself. After choosing a stop, estimate units with the position size calculator.
Multi-Timeframe Order Block Analysis
One of the most powerful techniques in order block trading is multi-timeframe confluence. Here's how experienced traders use it:
Higher timeframe (Daily/4H) sets the directional bias. If you spot a bullish order block on the daily chart, you know the area where you want to be looking for longs.
Mid timeframe (1H) refines the zone. Within that daily order block, look for a 1H order block. This gives you a much tighter zone with a better risk-to-reward ratio.
Lower timeframe (15M/5M) provides the entry trigger. Within the 1H order block, wait for a lower-timeframe break of structure or bullish engulfing pattern to time your entry.
This "nesting" technique adds conditions across multiple timeframes, but this article has no test data showing it improves win rate.
Order Blocks vs. Supply and Demand Zones
This is one of the most common points of confusion. While order blocks and supply/demand zones may look similar on a chart, they have key differences:
Supply and demand zonesare broader areas identified by any strong move away from a consolidation. They focus on the general area where buying or selling pressure emerged. The zones tend to be larger and less precise.
Order blocks are more specific chart zones drawn from selected candles before a move that breaks structure. Requiring an FVG and a structural break is one possible filter; a tighter zone does not ensure a better risk-to-reward ratio.
In practice, every order block contains a supply or demand zone, but not every supply/demand zone qualifies as an order block. The order block concept adds the structural break and imbalance requirements as additional filters.
| Feature | Order Block | Supply & Demand Zone |
|---|---|---|
| Precision | Tight — a specific candle/cluster | Broad area |
| Validation required | Break of structure + displacement (FVG) | A strong move away from the zone |
| Risk-to-reward | Higher (tighter stop) | Lower (wider zone) |
| Best suited to | SMC/ICT traders | Beginners & general price action |
How Order Blocks Connect to Breaker Blocks and FVGs
If you're building a complete Smart Money Concepts trading approach, order blocks don't exist in isolation. They work alongside two other key concepts:
Fair Value Gaps (FVGs):As mentioned earlier, the strongest order blocks create FVGs during displacement. When price returns to fill an FVG that sits within an order block zone, you get a high-confluence entry. Check out ourcomplete FVG trading guidefor detailed strategies.
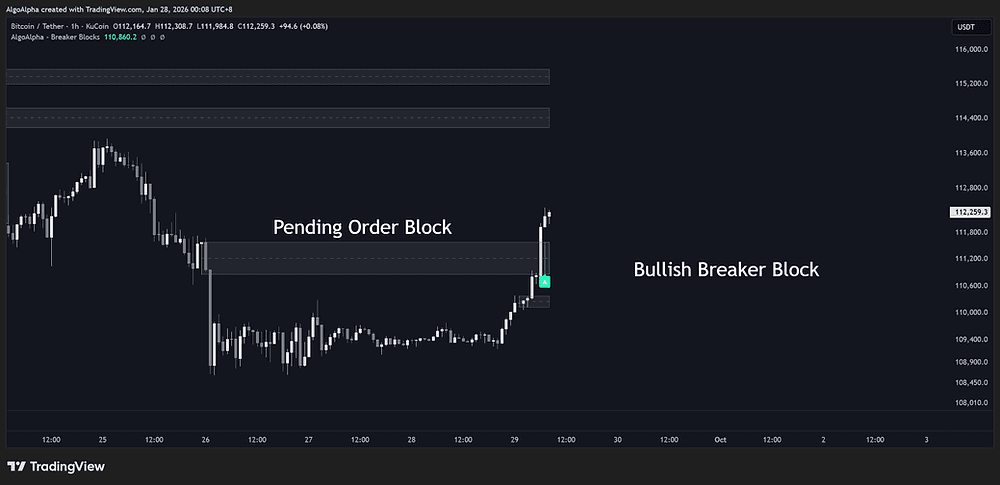
Breaker Blocks: In some SMC methods, an order block that price trades through fully is relabeled a breaker block, with its role treated as reversed. The label does not show that traders are trapped or make an entry high probability. Learn how to trade breaker blocks in our dedicated guide.
These three labels give traders separate ways to describe candle patterns and price structure.
Order Block Types: Continuation, Reversal, Mitigation, and Breaker
Not every order block serves the same purpose. Recognising the type tells you what to expect when price returns:
- Continuation order block — forms in the direction of the prevailing trend; the label alone does not establish its probability of success.
- Reversal order block — forms at the end of a trend, usually after a liquidity sweep and a change of character (CHoCH). Used for counter-trend reversals.
- Mitigation block — an order block price has returned to and partially filled. Once mitigated beyond ~50%, treat it as spent.
- Breaker block — a failed order block that price trades fully through, then flips to act as a zone in the opposite direction (covered above).
A quick note on structure: a break of structure (BOS) confirms trend continuation, while a change of character (CHoCH) is the first sign of a potential reversal. Continuation order blocks pair with a BOS; reversal order blocks pair with a CHoCH. See our break of structure guide for the full breakdown.
Common Mistakes That Ruin Order Block Trades
Mistake 1: Trading Order Blocks Against the Trend
A bullish order block can fail in a broader downtrend. Some traders use higher-timeframe direction as a filter, but it does not guarantee a reaction.
Mistake 2: Marking Every Last Candle as an Order Block
Not every opposing candle before a move is an order block. Remember the filters: the move must break structure, it should create an imbalance (FVG), and the zone must be unmitigated. Without these criteria, you're just drawing random boxes on your chart.
Mistake 3: Entering Without Confirmation
Placing a blind limit order at an order block and walking away is a recipe for getting stopped out. Wait for price to enter the zone AND show a reaction — a wick rejection, engulfing candle, or lower-timeframe BOS — before committing capital.
Mistake 4: Using Too Tight of a Stop Loss
If your invalidation rule uses the full zone, a stop inside that range may not match the rule. Account for tick size and the chance of slippage when selecting an order type.
Mistake 5: Ignoring Liquidity Above or Below
Before trading a bullish order block, mark nearby equal lows and other swing levels. Price can cross those levels before either reversing or continuing. Define your entry and invalidation rule in advance, and recalculate position size if you change the stop distance.
Best Timeframes for Order Block Trading
The best timeframe for order blocks depends on your trading style:
Swing traders:Use daily order blocks for directional bias, 4H for zone refinement, and 1H for entries. Holds typically last 2-10 days.
Day traders:Use 4H order blocks for bias, 1H for zones, and 15M for entries. Holds last hours within a single session.
Scalpers:Use 1H order blocks for bias, 15M for zones, and 5M or 1M for entries. Holds last minutes to an hour.
Higher timeframes show fewer candidate zones, while lower timeframes show more detail. There is no universally best interval or win rate established here; evaluate the same rules across the timeframes you trade.
Using TradingView Indicators to Spot Order Blocks
Manually identifying order blocks works, but it's time-consuming and prone to human error — especially when you're scanning multiple assets across multiple timeframes. TradingView offers several tools that can help automate this process.
Look for indicators that automatically detect and mark order blocks based on break-of-structure criteria. The best ones will also identify whether the order block has been mitigated, saving you from trading zones that have already been tapped.AlgoAlpha's TradingView indicatorscan help streamline this identification process, letting you focus on execution rather than spending hours marking up charts.
When evaluating any order block indicator, make sure it includes: automatic BOS detection to validate order blocks, mitigation tracking so you know which zones are still live, multi-timeframe display so you can see higher-timeframe OBs on your entry chart, and alert functionality so you don't have to stare at charts all day.
FAQ
Is order block a good strategy?
An order block is a charting method, not a proven result by itself. Whether a rule set has positive expectancy depends on the market, timeframe, entry and exit rules, costs, and sample. This article has no test data to support a general win-rate figure.
What is the best timeframe for order blocks?
There is no single best timeframe for order blocks. A 1-hour, 4-hour, or daily chart changes the size and frequency of candidate zones; choose intervals that fit your plan and evaluate the same marking and entry rules on each.
What is OB and BB trading?
OB stands for Order Block and BB stands for Breaker Block — both are core Smart Money Concepts (SMC). An order block is the consolidation zone before an impulsive move, while a breaker block is a failed order block that gets swept and then acts as a zone in the opposite direction. Many SMC traders use both concepts together: they trade valid order blocks for trend continuation and breaker blocks for reversals after a failed order block gets taken out.
How are order blocks different from support and resistance?
Traditional support and resistance levels are often drawn from previous highs and lows. Order blocks are zones based on selected candles before a move; requiring a break of structure and displacement makes this method more selective, but not necessarily more precise than general support/resistance.
Ready to identify order blocks faster? Explore AlgoAlpha TradingView indicators designed to detect Smart Money Concepts patterns, including order blocks, fair value gaps, and breaker blocks. Review automated markings against your own chart rules.
- smart money concepts
- order blocks
- SMC trading
- institutional trading
- order block trading strategy
- fair value gap
- breaker block
Do this automatically
ILPAC marks order blocks, FVGs, liquidity sweeps and BOS/CHoCH on your TradingView chart automatically.